Zero-Scale Zeebe with Cloudflare Workers
A Cloudflare worker that provides a zero-scale Slack messaging task for Camunda Cloud, using the Camunda Cloud HTTP Worker.

I get questions about running Zeebe at “zero-scale”. That means workers that consume no resources when there are no tasks to perform.
The Zeebe service on Camunda Cloud includes a generic HTTP-Worker that can be used to achieve this. The HTTP-Worker polls for jobs of type “Camunda-HTTP”, and then invokes a REST endpoint based on the HTTP verb and URL set in the task headers. If you are not on Camunda Cloud you can use zeebe-http-worker, or just write your own. In combination with “serverless” functions, this can be used to achieve a zero-scale architecture.
Cloudflare workers are serverless processes that run in response to REST requests at the edge of Cloudflare’s hosting infrastructure. “At the edge” means that a request to a Cloudflare worker is routed to the nearest point in Cloudflare’s infrastructure and executed there.
Cloudflare workers can be written in JavaScript, or in WebAssembly.
This is a Cloudflare worker that provides a zero-scale Slack messaging task for Camunda Cloud, using the Camunda Cloud HTTP Worker.
On the free tier of Cloudflare Workers, you can send 100,000 messages a day.
The code is simple - most of the complexity is moved to configuration:
const micromustache = require('micromustache')

addEventListener('fetch', event => {
  event.respondWith(handleRequest(event.request))
})

async function handleRequest(request) {
  if (request.method === 'POST') {
    const body = await request.json()
    const message = request.headers.get('message') || body.message || ''

    const renderedMessage = micromustache.render(message || '', body || {})
    const slackwebhook = request.headers.get('slackwebhook')
    const channel = request.headers.get('channel')

    await fetch(slackwebhook, {
      method: 'POST',
      headers: {
        'Content-Type': 'application/json',
      },
      body: JSON.stringify({
        channel: channel || '#general',
        text: renderedMessage,
      }),
    })
  }

  return new Response(
    {},
    {
      headers: { 'content-type': 'application/json' },
    },
  )
}
Setup
Slack Setup
- Go to your Slack.
- Click on the part that has your name and the Slack team name, then go to “Customize Slack”.
- Click on “Configure apps”.
- Search the App Directory for “Incoming WebHooks”.
- Click on “Add to Slack”.
- Choose a channel, then click on “Add Incoming WebHooks integration”
- Copy the Webhook URL.
Cloudflare Setup
- Sign up for a Cloudflare Workers account.
- Clone this repo, then cd into the checked out directory and run
npm i. - Install
wrangler, the Cloudflare Worker CLI:
npm i -g wrangler
- Grab your Account ID from your Cloudflare dashboard (click on Workers on the right). Put the Account ID into
wrangler.tomlin theaccount_idfield. - Create a new API key in your Cloudflare account. Click on “Get your API token” under your Account ID, and create a new token with Permissions: Account > Workers Scripts > Edit.
- Copy the API key.
- Run
wrangler config. - Enter the email address of your Cloudflare account, and paste in the API key.
- Now publish the worker with
wrangler publish - Copy the url of your deployed Cloudflare worker.
Camunda Cloud Setup
- Log in to your Camunda Cloud account.
- Go to the configuration screen for your cluster.
- Click on “Worker Variables” next to the HTTP-Worker.
- Create a new variable
slackWorkerUrland paste in your Cloudflare Worker url. - Create a new variable
slackWebhookand paste in your Slack webhook url.
Use
Check the bpmn/test-message.bpmn file for an example.
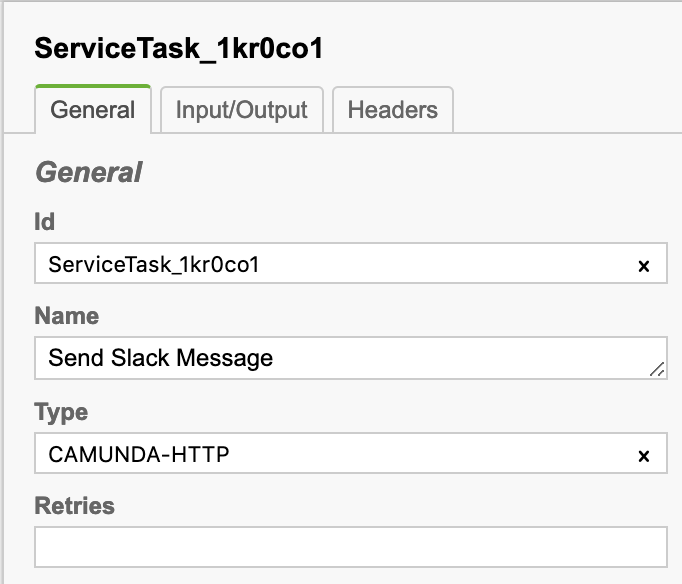
To send a message to Slack in a business process, add a task with the Type “CAMUNDA-HTTP”.
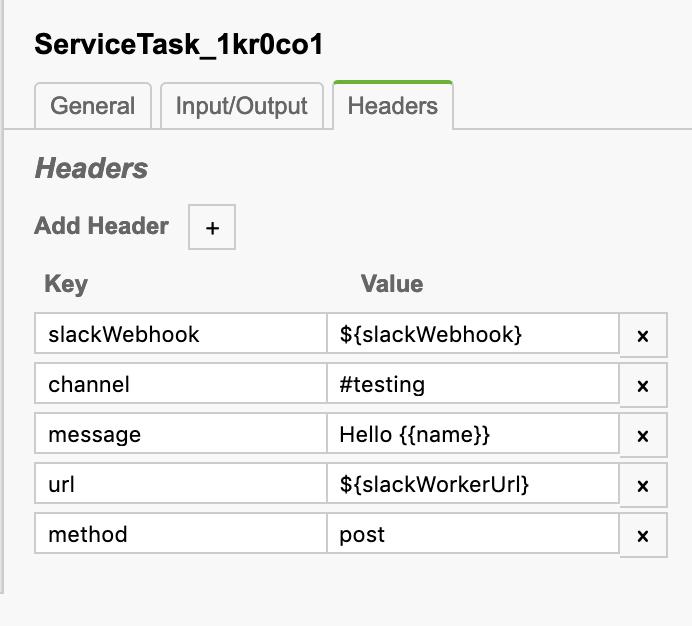
Set these Headers on the task:
url:${slackWorkerUrl}slackWebhook:${slackWebhook}method:post
You have two options for setting the message.
- You can hardcode a message in the task header.
- You can set a
messagevariable in the workflow.
Either way, any field that you want replaced by a variable from the workflow should be escaped like this: {{ variable }}.
The templating is performed using micromustache.
In the example, the message is set in the headers: Hello {{ name }}. When the worker receives a job, it substitutes the value of the variable name. If you examine the file bpmn/test.js, you’ll see that it kicks off a workflow setting the variable name to “World!”, leading to the Slack message “Hello World!”.
Running the demo
- Cd into the
bpmndirectory. - Run
npm i. - Grab your config from your Camunda Cloud account (create Client credentials for the cluster if you don’t already have some in there).
- Run the demo like this - substituting your configuration:
ZEEBE_ADDRESS=${YOUR CLUSTER CONTACT POINT} \
ZEEBE_CLIENT_ID=${CLIENT ID} \
ZEEBE_CLIENT_SECRET=${CLIENT SECRET} \
node index.js


